Hot Cocoa Bombs
12-23-2020
I knew as soon as I saw a hot cocoa bomb melting into a hot mug of milk that I would have to make some. “It’ll be fun,” I thought, always up for a kitchen challenge. I hopped on Amazon and ordered two silicone molds (this was a few months before they became the food trend of holiday 2020 and molds were plentiful). They sat in my kitchen until Thanksgiving, when I had enough time to experiment. I had bold dreams of making enough to share with local friends and even send to loved ones around the country. I even ordered some edible gold and silver glitter stars to adorn them. They would be epic.
They would be epic, all right – epically frustrating. After four sessions, I wound up with about 18 of the orbs, all with various amounts of weirdness; although tasty, just didn’t possess the dashing good looks – or even just an acceptable level of “here, eat this” – that I had envisioned. Scratch “homemade hot cocoa balls” off my gift list for people.
Read almost any how-to post from a blogger who tackled the same project and you’ll get the feeling that making them yourself is a snap. I’m here to tell you – even reassure you if you had an experience similar to mine – that it’s not quite that simple. Will I make them again, thinking “fifth time’s the charm”? No. But if you want to give them a shot, here are some of the lessons I learned along the way.
Batch 1
Excitement high, I tempered the chocolate (Trader Joe’s 72% Pound Plus bar) in my Anova sous vide cooker, using a technique from Serious Eats. While more time-consuming than other methods, it’s easy and held the chocolate at the right temp for a long time. I put the chopped chocolate in a disposable pastry bag and followed the directions to a T. When I was ready to fill the molds, I snipped off the bottom of the bag and squeezed out the chocolate, using a pastry brush to spread the chocolate evenly. Then I refrigerated the bombs for about 30 minutes. Meanwhile, I whipped up a batch of Martha Stewart’s Hot Cocoa Mix to use as the filling and dug out my mini-marshmallows.
Then came the fun part. (And when I say “fun,” I actually mean frustrating.) I unmolded the chocolate halves, filled one side with a tablespoon of cocoa mix and a few marshmallows, topped each with a second half and sealed them. I mean, tried to seal them. Despite my best efforts, the edges were uneven and left little gaps along the seam. I ran a thin paintbrush of melted chocolate along the seam to secure them, then rolled the middles in pearl sugar. That worked for about half of them but caused the gaps in the other half to become even bigger as the seaming chocolate melted the orb. I shoved a marshmallow in one of the gaps and painted on a little more chocolate, which did the trick but looked rather Frankenstein-y. After doing the best I could to decorate, including sprinkling a few silver and gold stars over the tops, I refrigerated them to set the chocolate along the seal.
Outcome? Five decent hot cocoa bombs but perhaps not decent enough to give away. I’d have to try again.
Batch 2
I had read so many posts from people saying that they had great results without tempering the chocolate the hard way. Instead, they microwaved the chopped chocolate for 30 seconds, stirred it and then microwaved it in 15-second increments just until it was all melted. Seemed easy enough, so I gave it a shot. I also picked up a tip to rub the edges of each chocolate half on a warmed plate before putting two halves together and thought that sounded like a smart idea. This time, I also tried to add more chocolate to the upper sides of the molds so the halves would be less likely to break. Oh, and I used chocolate chips this time because that’s what all the cool food bloggers were doing and their photos were gorgeous.
Melting the chocolate went well and I thought, “Success!” Despite using my new BFF, a warmed plate, I still had issues sealing the orbs. It was hard to get the edges “perfect” enough not to be an issue. And sealing them with a stripe of melted chocolate caused one of them to melt, even though I used cooler chocolate than I had the first time. Overall, they seemed ok, though, and I was excited that I might have a few to gift after all – until the next day, when I opened up the container holding them and saw that the cocoa bombs had taken on a whitish sheen, like they were ill. This was a sure sign of a bad temper (the chocolate’s, not mine).
I almost called it quits, but then I saw a post for Bailey’s-filled bombs and I knew my quest would continue.
Batch 3
Suspecting that chocolate chips might have been the problem, I decided to try the quick “tempering” process again but this time with my trusty Trader Joe’s chocolate. I lined the molds with chocolate, let them chill for 30 minutes, patched up any thin areas with cool-ish chocolate and gave them another chill. Then came the key moment: filling them with Bailey’s. Boy oh boy, was that … a mess. When I picked one up to paint a chocolate seam around the center, the booze leaked out a crack in the side. Using that half orb as a chocolate shot glass, I downed the liqueur and decided to switch back to the cocoa mix and finished the batch. Despite my best efforts, this batch discolored, too, and I vowed that this experiment was over. Then I thought: What if I gave real tempering one more shot, now that I had all this experience? Back to the kitchen I went.
Batch 4 (aka the last batch ever)
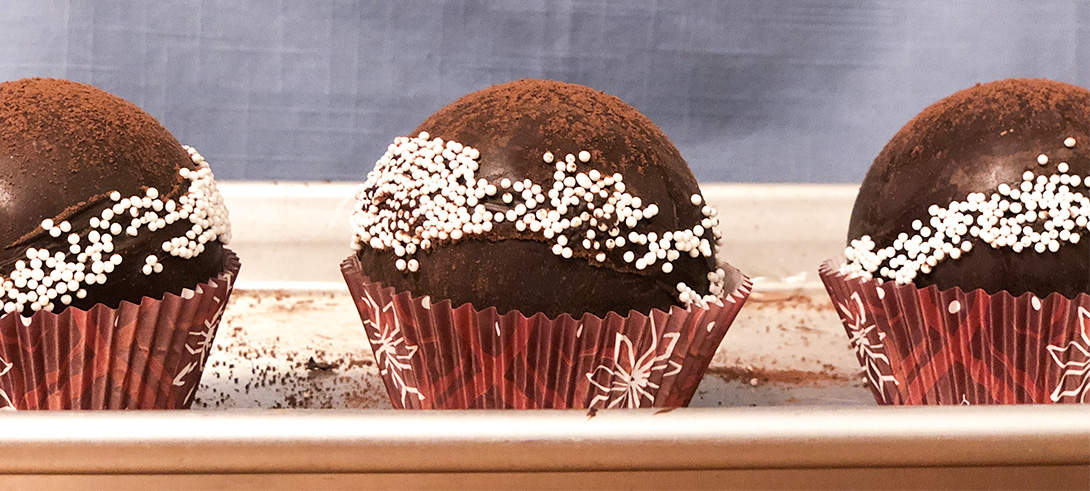
Trader Joe’s chocolate. Anova sous vide cooker. Plastic pastry bag. By now, I’d gotten this technique down and tempering went smoothly. I slathered the chocolate over the molds, chilled, slathered again with an excessive amount, chilled a tad more and then went to work. I’d love to say that the sealing part got easier, but that would make me a big, fat liar. It still sucked. But I somehow managed to wedge four bombs together successfully-ish, rolled them in sanding sugar and then sprinkled them with cocoa powder (cocoa powder can cover almost all faults, I discovered). These ones were appealing enough to photograph (that’s what you see at the top of this post) but by that point, there was no way I was giving these puppies away. They were mine, all mine (ok, and Ian’s).
Conclusion: While I’m glad I tried making cocoa bombs, I don’t think chocolate is my medium. After watching everyone on Pinterest flex their mad skills, I was feeling like the problem was me. So I was heartened to read in a Washington Post article sent by my mother that their editorial team had had problems making them, too (many of their issues the same as mine), and decided it was easier to buy them than make them. Next year, I’m going to skip the cocoa bombs entirely and go straight for the Bailey’s.